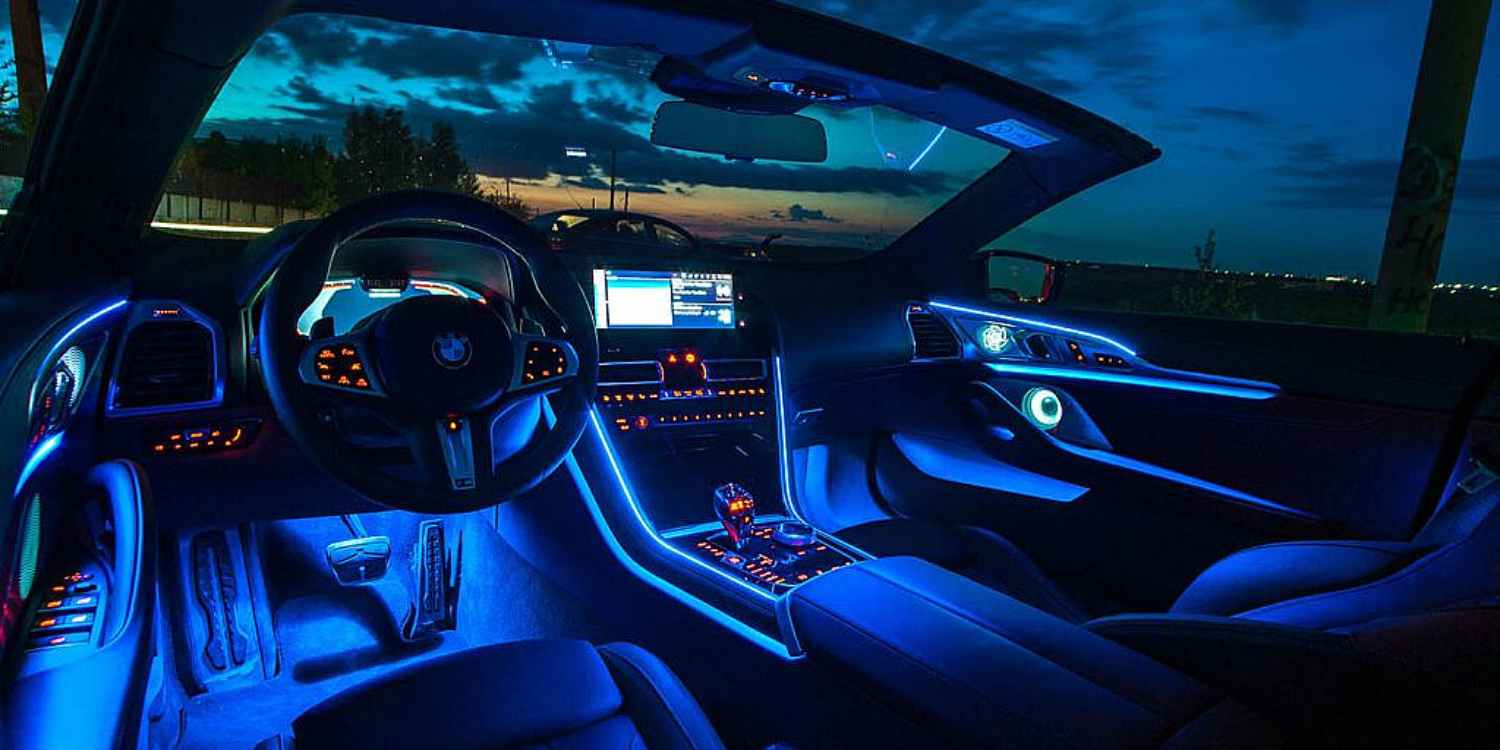
If you’ve ever sat in a high-end car and admired the soft, colorful glow outlining the dashboard, doors, or footwells, you’ve experienced the magic of interior ambient lighting. It doesn’t just look cool — it transforms your driving experience by creating a relaxing, luxurious atmosphere.
The good news? You don’t need a luxury car to enjoy this feature. With a bit of time and some basic tools, you can install ambient lighting in your own vehicle and give it that custom, premium feel.
In this guide, we’ll walk you through everything you need to know to install interior ambient lighting in your car — step by step, and totally DIY-friendly.
💡 What Is Car Interior Ambient Lighting?
Interior ambient lighting refers to soft, low-intensity LED lighting installed throughout a car’s cabin. Common areas include:
- Under the dashboard or footwells
- Around the center console
- Inside door panels or cupholders
- Under seats or along headliners
Some kits sync with music, change color via app, or react to door openings and vehicle activity. It’s both a style upgrade and a functional improvement for nighttime driving.
📦 What You’ll Need
Before starting your DIY lighting install, gather the following:
✅ Materials
- LED ambient light kit (choose between RGB, solid color, or app-controlled)
- 12V power adapter or fuse tap
- Double-sided tape or zip ties
- Wire connectors or quick splices
- Fuse tap kit (if connecting to fuse box)
✅ Tools
- Plastic trim removal tools
- Wire cutters/strippers
- Multimeter (optional but helpful)
- Electrical tape or heat shrink tubing
- Screwdrivers
- Smartphone (for app-controlled kits)
🔌 Choosing the Right LED Lighting Kit
There are a few types of interior lighting kits:
- Plug-and-play kits (plug into your cigarette lighter):
- Easiest to install
- Great for beginners
- Usually come with adhesive strips and no hardwiring required
- Hardwired kits (wired into your car’s fuse box or dome light):
- More permanent and hidden
- Takes more time but cleaner look
- Allows auto-on/off with ignition or door open
- Fiber optic kits (with light guides for dashboards or trim):
- Professional look
- Requires more patience to install
🛠️ How to Install Interior Ambient Lighting – Step-by-Step
Let’s break it down into manageable parts.
Step 1: Plan Your Layout
Decide where you want your lights to go. Common placements include:
- Under the dashboard
- Along footwells
- Under seats
- Around center console or door trim
Do a dry run with the lights powered on to see how the glow looks in different spots before committing.
Step 2: Disconnect the Car Battery
For safety — especially if hardwiring — disconnect the negative terminal of your battery. This protects you and the vehicle’s electronics while you work.
Step 3: Run the LED Strips
Use double-sided tape or adhesive backing to mount the LED strips or light tubes in your chosen locations.
Tips:
- Hide wires along seams, under floor mats, or behind trim.
- Use zip ties or clips to secure wires out of sight and away from pedals.
- For fiber optic kits, you may need to slightly pry open trim panels or use a trim tool to tuck in the fiber strands.
Step 4: Connect the Power
You have two options:
Option A: Plug into Cigarette Lighter (Easiest)
- Most beginner kits come with this option.
- Simply plug in and hide the wires along the console.
- Downside: Only powers when ignition is on, and the plug may look messy.
Option B: Hardwire to Fuse Box or Dome Light
- Use a fuse tap to connect your power wire to an “accessory” fuse (only powered when the ignition is on).
- Ground the negative wire to a bolt connected to the metal chassis.
- Route wires cleanly behind panels or under carpet.
If your kit comes with a control box, hide it in a glove box, under the dash, or next to the center console.
Step 5: Sync the Lights (If App or Remote Controlled)
Most modern kits come with an app or remote control. Pair the lights via Bluetooth or RF remote, and test functions like:
- Color changing
- Brightness adjustment
- Music sync mode
- Auto on/off features
Some kits even allow you to create custom light scenes or sync with GPS speed!
Step 6: Test Everything
Before reassembling your trim panels or reconnecting the battery, double-check:
- All lights turn on properly
- Brightness and color controls work
- No exposed wires or loose connections
- Wires don’t interfere with pedals or moving parts
Step 7: Reconnect Battery & Enjoy
Reconnect your battery, hop into your car, and hit the lights. You should now see your cabin glowing with stylish ambient lighting — all thanks to your own DIY handiwork!
🎨 Pro Tips for a Cleaner, More Custom Look
- Stick to one color theme for a sleek appearance (e.g., all blue or all red).
- Match OEM lighting if you want it to look factory-installed.
- Use diffused light strips for a soft, modern glow (avoid harsh LED points).
- Use music-sync mode sparingly — fun for car shows or parties, but not always ideal for daily driving.
- Avoid bright colors like white or blue directly in your line of sight while driving at night — they can be distracting.
🧠 Is It Legal to Use Ambient Lighting?
In most areas, interior ambient lighting is legal — especially soft, low-level illumination. However:
- Avoid flashing red or blue lights (these are reserved for emergency vehicles).
- Don’t install lighting that can reflect harshly on your windshield or rearview mirror — that could be considered a distraction.
- Check local vehicle laws to stay safe and street-legal.
🚗 Final Thoughts
Installing interior ambient lighting in your car is a fun and rewarding project — even if you’re a beginner. With the right kit and a bit of planning, you can transform your car’s interior into something straight out of a luxury catalog.
Whether you want a calming glow on late-night drives or a full-on party vibe synced to your playlist, ambient lighting gives you the freedom to express your style — one color at a time.
At Colibri Car Styling, we offer colour vinyl wrap, commercial vehicle wrap, paint protection film, detailing, polishing, ceramic coating, tinting, wheel and caliper painting, interior ambient lighting, remote starter, GPS tracker and kill switch. You can also find us on Facebook, Instagram and Youtube.